Chocolate Tempering Methods
The Why and How on Chocolate Tempering
Cover your own bon bons and candy bars, make your own chocolate dipped… anything, and never again buy pre-packaged “Dipping Chocolate.”
But, what is tempering? Is it necessary? Why do it at all?
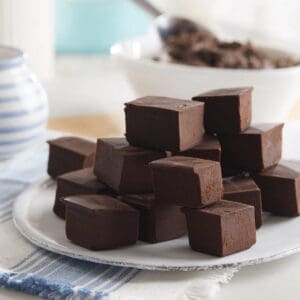
Tempering is the process by which the cocoa butter in chocolate crystalizes. Much like water which solidifies to form a snowflake, a single water crystal, or an ice cube (many water crystals interlocked together). When chocolate is properly tempered, what you get is solid consistency with a high sheen, a good mouth feel, and a distinctive snap when broken. You’ll most likely want to use couverture chocolate as it will have a higher percent of cocoa butter rather than compound chocolates which have replaced some of the cocoa butter with other fats or oils.
We use this brand when we experiment in the kitchen: Callebaut Dark Chocolate
Can you go without tempering? Sure. In fact, you wouldn’t want to go through the trouble if all you are doing is baking chocolate chip cookies or pouring melted chocolate over ice cream. You could even get away with skipping this step when dipping fruit if you don’t mind a matte finish, the softer mouth feel, and keeping them in the fridge until serving.
However, if you want your chocolate bark, nut clusters, candy bars, and truffles to hold together and look their absolute best; then, read on.
There are two tried and true methods to tempering; the Inoculation or Seed Method and the Tablier Method.
In both methods you are bringing the temperature up, cooling the cocoa butter, and re-warming it. Why? Cocoa butter can melt anywhere between 63°F and 97°F. For a proper temper, all the existing cocoa butter crystals must be melted away so they can then crystallize together.
In fact, there are six distinct cocoa butter crystal types. All of which form at different temperatures and times. Type-V crystals are what we’re aiming for. Where some are soft and crumble easily, others even are so large they can be seen with the naked eye and will make chocolate look streaked and hazy. We call this “blooming.” Type-V crystals have the strongest structure, highest gloss, and best snap. If you are interested in more of the science behind tempering, Wikipedia (https://en.m.wikipedia.org/wiki/Chocolate) has it broken down pretty well…well enough for me to understand.
In the Inoculation (Seeding) Method, the chocolate is brought up to heat and melted, and then small cold “seeds” both bring the temperature back down while acting as the first crystals by which the rest of the cocoa butter can crystallize around at the best temperature to form our Type-V crystals.
In the Tablier Method, the chocolate is melted and poured onto a cold slab such as marble or granite. as the slab cools the chocolate, it begins to harden and crystallize. More melted chocolate is added gradually to bring the temperature back up.
Essentially, one is adding cold crystals to warm liquid chocolate and the other is adding warm liquid chocolate to cold crystallized chocolate.
Here’s how to do it:
Method 1 – Inoculation or Seed Method
I tend to use this method more often as it requires less clean up and is a little easier to maintain the proper temperature.
WHAT YOU NEED:
- At least a pound of chocolate. Any less is hard to temper properly. If you don’t use it all, you can store the rest for later. Your chocolate should be in small disks, morsels, or chopped for quicker melting.
- Microwave safe bowl. This can be glass or metal. Yes, you can put metal in the microwave. Just don’t let the rim of the bowl touch the wall of the microwave when it is running! My microwave has the battle scars, AKA; scorch marks, to prove it.
- Rubber scraper
- Candy/chocolate thermometer
DIRECTIONS:
- 1. Set 20-25% of your chocolate aside and melt the rest. This can be done on the stovetop with a sauce pan with an inch or two of water heated to just barely steaming. Seat your chocolate bowl over the sauce pan and stir frequently. This is a more traditional method for melting your chocolate but be careful not to get any water inside your bowl. Chocolate and water do not play well together.
- Another way to get the job done is to place the chocolate bowl in the microwave on medium power at 20-25 second intervals to melt. Stir frequently to prevent scalding.
*Both the stovetop and microwave methods have their pros and cons. The double boiler has the nuisance of water and adds humidity to the environment, but you can maintain a constant temperature more easily. With the microwave you’re going back and forth dozens of times, but no water and less chance of a runaway temperature. …unless you completely forget your metal bowl too long while it’s getting nuked! - Bring to the appropriate temp for the type of chocolate your using:
- White chocolate – 113°F
- Milk Chocolate – 115°
- Dark Chocolate – 118°F
- Your candy thermometer will be very useful at this stage and later as the sweet spot for white, milk, and dark chocolates vary. White chocolate could be 113°and dark chocolate is closer to 118°. However, because every manufacturer’s recipe for chocolate is different, so could be that chocolate’s best tempering temperature.
*Because I can’t see either an analog or a digital thermometer, I use the Weber iGrill 3 Thermometer. You can connect up to four probes which all can be monitored from up to 150 ft. away. It’s great for the baking, on the stove, and out in the smoker! Though, if you’re tempering four bowls of chocolate at once, you must have eight arms!
Once entirely melted, remove from heat (if using the stovetop) and gradually add the reserved pieces to the melted chocolate as you stir being sure to scrape the sides. - Bring the temperature down.
- White Chocolate – 78°F
- Milk Chocolate – 80°F
- Dark Chocolate – 82°F
- Test your temper by placing a small amount about the size of a quarter on a piece of wax or parchment paper. as it cools it should begin to harden and take on a glossy sheen. You may want to do this intermittently throughout your chocolate project if you find that you need to re-warm your bowl. It isn’t uncommon to overheat the chocolate to the point it falls out of temper.
Method 2 – Tablier
WHAT YOU NEED:
- Same as above plus…
- Smooth stone work surface
- Dough or putty knife
DIRECTIONS:
- Melt your chocolate as above with a double boiler or in the microwave. Only this time melt it all.
- Pour about half of your melted chocolate onto a marble or granite slab. The stone counter top or cutting board is important as it will hold its temperature longer. Return the reserved portion to the stovetop or microwave in order to maintain a temp of at least 115°F.
- Begin spreading, scraping, folding, and generally swirling the melted chocolate around on your slab. There is, of course, some professional technique and I’m also sure you could find a video tutorial online to show you how, but just grab a dough knife or a putty knife from Home Depot (properly cleaned) and schmear. As the chocolate cools on your slab it will begin to harden. That’s the cocoa butter crystals beginning to form. The chocolate should be nearing the target 78°-82°F range.
- Gradually ladle the warm chocolate into the tempered chocolate on the slab and continue to mix until all of your chocolate is tempered. You may want to keep some back in reserve at your 113°-118° region to add to keep your main batch from cool too much.
*If working with larger amounts of chocolate and you don’t have enough counter space for it all, you can transfer the already tempered chocolate to another bowl and add the warmer chocolate as necessary to continue the process and maintain the appropriate temperature.
Bonus Method 3! – Forget everything above and buy a tempering machine. I know. It’s cheating, but if you are doing a lot of chocolate, they’re worth the investment. KitchenAid makes the KitchenAid Precise Heat Mixing Bowl that can also perform double duty by mixing and proofing bread dough.
Ok, clear as chocolate mousse? Easy in theory, sometimes tricky in practice. It has been said that chocolate sometimes has its own personality. It’s true! Chocolate will “behave” differently depending on season, humidity, altitude, overall percent of cocoa butter to other fats and total ingredients, whether or not I’m in a hurry, and for no discernible reason at all. Use your thermometer and do test samples. Soon enough, you will get to know the chocolate you are working with. Now, I’m judging the temp of my chocolate out of the microwave by the feel of the bottom of the bowl in my palm.
Awesome! You know how to temper chocolate! Now, you can enrobe truffles, pretzels, potato chips, turtles, bacon, your husband’s sunglasses. …What?!? Hey! Whatever. I don’t really need them. You can pour that tempered chocolate into thousands of molded shapes. The possibilities are limitless! For some incredible tempered chocolate art, check out Patrick Roger’s sculptures (https://www.patrickroger.com/en/sculptor)!
Share your thoughts, questions, and tempering adventures below in the messages section!

Extra Ordinary Delights