Chocolate Enrobing
UH… YOUR BON BONS ARE SHOWING. WOULD YOU PLEASE COVER THEM UP?
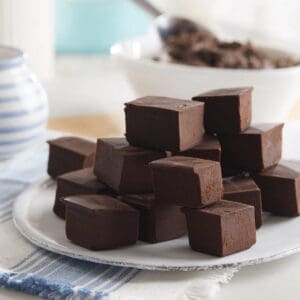
Enrobing is simply another term for covering. Whatever you may be covering; ganache, nougat, caramel, fresh fruit, etc.; enrobing will protect that candy from the air, keep the moisture locked inside, help your bon bon maintain its shape. Enrobing also gives your candy an added dimension and you another opportunity to add flavor and character to your creation.
What to enrobe your candy in? This depends on your tastes, esthetics, and what flavors you want to put into your truffles. I’ll give you a few ideas and let you decide what will work best for your next delicious creation.
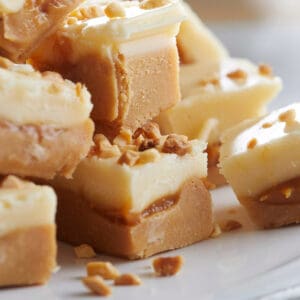
Easier and quicker, cocoa powder, chopped nuts, or sprinkles may be the perfect thing to roll your bon bona in. I covered half my batch of Lemon Ginger Green Tea White Chocolate Ganache in chopped pistachios, and it turned out to be a great idea! One thing to remember is that these options are porous, and the candy inside will not keep as long as if enrobed in couverture.
What is Couverture? This is enrobing in fine tempered chocolate. When chocolate makers produce couverture a greater percentage of the overall fat in the chocolate is cocoa butter. I explain more about why cocoa butter is important in Chocolate Tempering. Just keep in mind that you can enrobe with other chocolates, but you may not get the same quality taste, mouth feel, snap, or glossy sheen at the end.
While it takes a little more effort, the benefits are apparent. First, your candy will be locked in an airtight chocolate shell and will last a bit longer. Of course, you will still want to keep your finished product in a cool, dry place. Preferably, in an airtight container of its own.
Enrobing in chocolate also allows you to decorate in so many great ways! While the chocolate is still soft, you can press in candied nuts or a coffee bean. There are gold and silver flake sheets you can cut and place on top or decorate with candy paint. Or, you can simply score or stamp a design into the top. Let’s not forget…you could also drizzle more chocolate over your chocolate truffle shell! The possibilities are limitless.
HOW TO ENROBE YOUR BON BON:
First, have your filling ready. Whether you have made a ganache, fruit or nut filling, or something else; get your candy prepared. This may mean cutting after slabbing, balling, molding, etc.
Next, cover. If using powder, nuts, or sprinkles, just roll your candy around and gently press the covering material into the candy. Your body heat transferred from your hands will soften the exterior of the candy making it a bit stickier. Thus, more apt to adhere to your covering materials. Just be careful you don’t warm it up so much that it begins to lose shape.
If you have chosen to enrobe in chocolate, you will first have to temper enough to cover your batch of candy. I explain more about the tempering process here.
There are a few different ways to apply your tempered couverture to your candy treats. Which method you will use all depends on what shape you want your final product to take. No one way is better or will necessarily look more professional. In the end, this is an art, and these are different methods to create that art. I suggest you try them all and only stick to one when you’re satisfied with the overall final product.
Note: Most professional chocolatiers will enrobe and decorate one type of filling the same way as a means of identifying what is inside. If you have a coffee ganache inside, maybe you dipped it into dark chocolate and pressed a coffee bean into the top.
DIPPING:
Find yourself a dipping fork. Dipping forks are smaller and often have only two tines. You can use a standard table fork, but the tines are too close together and may be difficult to use. Take care to clean any chocolate or candy filling between the tines to prevent transfer. Either cradle the filling or stab it with the tines and dip. Be sure the entire piece of filling is covered and gently shake or scrape against the edge of the bowl to remove any excess chocolate from the bottom.
How to know my bon bon is completely covered is the trickiest part since I am blind. If I’ve gotten all the excess off is an additional challenge. Truthfully, I’m a disaster. Chocolate has been the bain of my existence since the get go. I dip the truffle, it falls in the melted chocolate, I go knuckle deep into the mess after it, and so on. Tempered chocolate all over me, the tempering machine, counter top, and everywhere else but my truffles. Later, I find I hadn’t successfully gotten the excess chocolate from the bottom and placed each bon bon too close together. Which resulted in one large sheet of chocolates, something resembling petrified bubble wrap. One tip I’ve used that has helped is to string a taught wire across the bowl of your dipping chocolate. You can scrape the excess off and it will fall back into the bottom instead of adhering and hardening to the cool sides.
HAND ENROBING:
Many chocolatiers will place a dollop of tempered chocolate into the palm and roll the candy filling around in their hand to coat it. Since your body temp is perfect for keeping chocolate melted but not to take it out of temper, this method works great for some.
Once your truffle is covered, place on parchment paper or a silicone rubber mat to firm up. I would give the first one a minute as a test subject before moving on to the rest of the batch. This will ensure your chocolate is properly tempered and there aren’t any other surprises.
USING MOLDS:
There are a few types of molds and a few ways to use them. The two most popular types are silicone rubber and polycarbonate. I prefer polycarbonate. Despite being a bit more expensive, polycarbonate molds are more durable, easier to clean, and easier to use. Some come with magnetic metal bottoms that can be removed to pop pout your finished product.
You can either go filling first or chocolate first into the mold. If you go filling first, you are essentially creating the mold shape and reverting to the dipping method. If you decide on chocolate first, here are a couple tips…
Put enough chocolate into each cavity to coat the inside and tip the mold to allow the rest of run out. Scrape the excess off with a pastry knife or a simple putty knife from the hardware store works great. The chocolate may need a little coaxing to come out. Your phone on vibrate could work. …or, you can just splurge on a vibrating table (see table here)! C’mon, you’re going to be a chocolate pro after all!
Once your cavities are coated place some filling in and cover with more chocolate. Again, the putty knife works great.
This method really only works with the polycarbonate. Silicone tends to absorb any vibrations and can be too flexible for scraping. For silicone molds I would just fill the cavities with chocolate and press your candy filling into the center. Thereby, forcing excess chocolate out the top which can be used to cover the exposed filling.
For either type of molds, it is important to remember that tempered chocolate will want to adhere to the surface of your molds. To prevent this and any possible discoloring or breaking later, the molds should be the same temperature as the chocolate. A few seconds with a hairdryer works. I will put my oven on low for a couple minutes and turn it off before putting my molds in to warm. I also live in Florida, just putting them on a rack on the porch for a few minutes does the trick.
If you are still having trouble getting your finished chocolates out, you can put them in the fridge for a few minutes. Then, take them out and leave them on the counter for a minute before attempting to take the chocolates out. The time in the fridge will cause the chocolates and molds to contract slightly. The minute on the counter will allow the mold to warm and expand some as the chocolate remains cold. It is not recommended to leave your chocolates in the fridge too long.
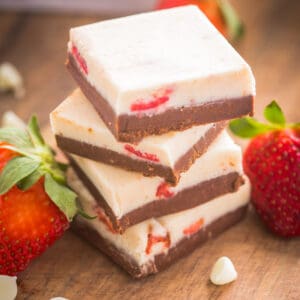
That’s it. Well, we can go into much more detail with each different method for sure, and I will, but you get the gist. Why not start by tempering your very favorite white and dark chocolates. Then, enrobe some sweet ripe juicy strawberries with little tuxedoes! Better yet… Enrobe some pretzels, potato chips, or bacon! Have fun and tell me how your next enrobing project goes below.

Extra Ordinary Delights